
From Farm to Table: Supporting Local Manitoba Producers
From Farm to Table: Supporting Local Manitoba Producers Manitoba’s local food movement connects conscious consumers with fresh, high-quality products straight

Egusi soup stands as one of West Africa’s most beloved dishes, but getting that perfect, restaurant- quality texture and flavor at home can feel tricky. This guide is perfect for home cooks ready to move beyond basic recipes and create egusi soup that rivals what you’d find at the best Nigerian restaurants.
You’ll discover the essential ingredients and equipment that make all the difference, plus learn how to prep your ingredients like seasoned chefs do. We’ll also walk through the complete cooking process step-by-step, so you can nail that creamy, well-balanced soup every single time.
By the end, you’ll have professional tips for avoiding common mistakes and know exactly how to serve and store your egusi soup for maximum flavor.
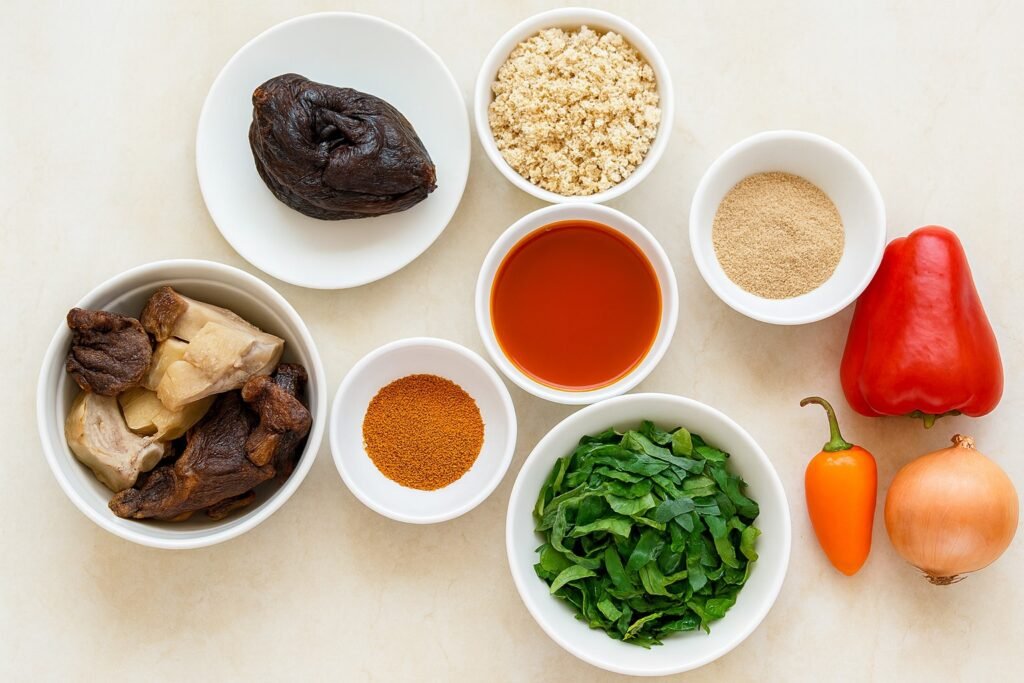
Ground egusi seeds form the heart of this beloved West African soup, so quality matters tremendously. Look for seeds that appear plump, uniform in color, and free from cracks or dark spots. Fresh egusi seeds should have a mild, nutty aroma without any musty or rancid smell. You can buy whole seeds and grind them yourself for the freshest flavor, or purchase pre-ground egusi from reputable African grocery stores.
When grinding whole seeds, toast them lightly in a dry pan for 2-3 minutes to enhance their nutty flavor before processing. Use a high-powered blender or spice grinder to achieve a fine, smooth powder. Avoid over-processing, which can release too much oil and create a paste-like consistency. Store ground egusi in airtight containers in the refrigerator for up to three months or freeze for longer storage.
Pre-ground egusi saves time but varies widely in quality. Check the packaging date and choose brands with minimal additives. Good ground egusi should flow freely without clumping and maintain its light tan color.
The protein combination you choose dramatically impacts your soup’s final taste and texture. Traditional options include beef, goat meat, chicken, fish, and seafood, each contributing unique flavors and cooking requirements.
For beef, select cuts with good marbling like chuck roast or short ribs. These tougher cuts become
tender during the long cooking process while releasing rich flavors into the broth. Cut meat into bite- sized pieces for even cooking and easier serving.
Fresh fish works beautifully in egusi soup. Catfish, mackerel, or snapper provide excellent flavor profiles. When using fish, add it later in the cooking process to prevent overcooking and breaking apart. Smoked fish adds incredible depth – soak it briefly to remove excess salt before adding.
Chicken thighs offer more flavor than breasts due to their higher fat content. Remove skin if you prefer a lighter soup, but keep bones intact for maximum flavor extraction. Many cooks combine multiple proteins for complexity – perhaps beef and fish, or chicken with dried shrimp.
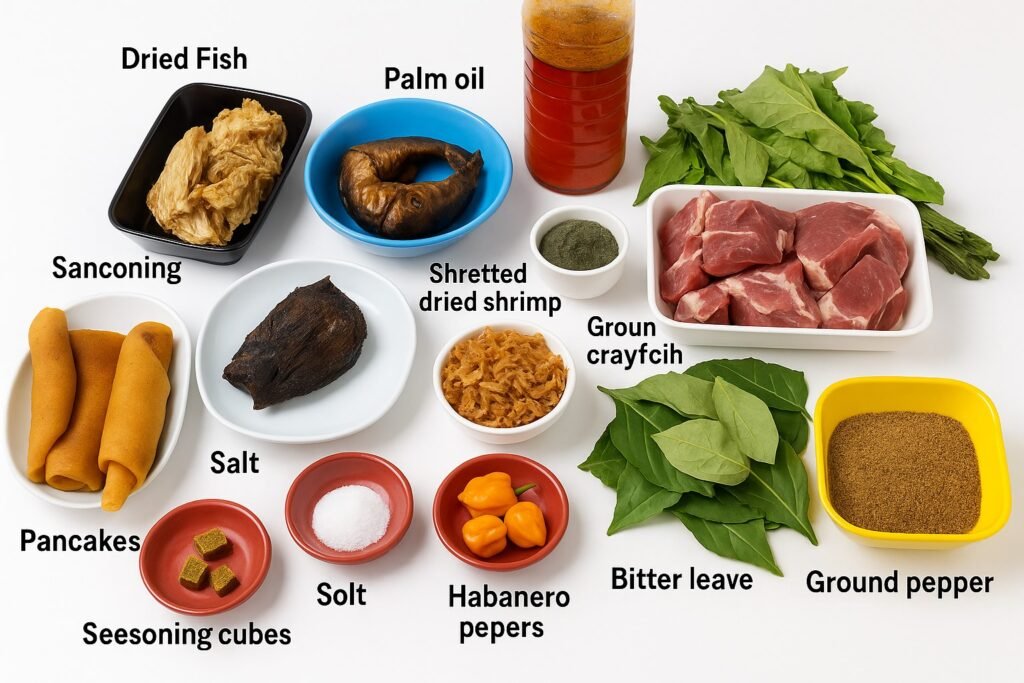
Stock fish and dried shrimp serve as flavor enhancers rather than main proteins. Soak stock fish overnight and break into smaller pieces. Rinse dried shrimp and grind coarsely to release their concentrated flavor throughout the soup.
Leafy greens transform egusi soup from good to exceptional while boosting nutritional value significantly. Spinach remains the most accessible option, but traditional choices like bitter leaf, pumpkin leaves (ugu), or water leaf create more authentic flavors.
When using spinach, choose fresh bunches with vibrant green leaves and firm stems. Baby spinach works well but mature spinach provides better texture and flavor. Wash thoroughly and chop coarsely – fine chopping causes vegetables to break down too much during cooking.
Bitter leaf requires special preparation to remove its natural bitterness. Wash repeatedly in salted water, squeezing and massaging the leaves until the water runs clear. This process removes the bitter compounds while preserving the leaf’s unique flavor and nutritional benefits.
Pumpkin leaves (ugu) offer a mild, slightly sweet taste that complements egusi perfectly. These tender leaves cook quickly, so add them during the final minutes of cooking. Scent leaf provides an aromatic finish – add just before serving to maintain its delicate fragrance.
Many recipes include diced tomatoes, bell peppers, and onions as flavor bases. Choose ripe, firm tomatoes and remove seeds for less acidity. Red bell peppers add sweetness, while scotch bonnet or habanero peppers provide heat – adjust quantities based on your spice preference.
Professional egusi preparation requires specific tools that make the process smoother and more enjoyable. A heavy-bottomed pot or Dutch oven distributes heat evenly and prevents burning – essential for the long, slow cooking process that develops deep flavors.
Sharp knives speed up vegetable preparation significantly. A good chef’s knife handles most cutting tasks, while a smaller paring knife works well for detailed work like removing fish bones or chopping aromatics.
A reliable blender processes ingredients smoothly. You’ll need it for grinding tomatoes, peppers, and onions into a smooth paste, and potentially for grinding egusi seeds if buying them whole. Food processors work as alternatives but may not achieve the same smooth consistency.
Wooden spoons prevent scratching your pot’s surface while stirring thick soup. The long handle keeps your hands safely away from splattering hot oil. Keep several wooden spoons dedicated to cooking – they absorb flavors over time.
Fine-mesh strainers help when working with stock fish or removing any lumps from ground ingredients. A large slotted spoon makes removing proteins or vegetables easy when you need to add them back later in the cooking process.
Measuring cups and spoons ensure consistency between batches. While experienced cooks often eyeball measurements, precise amounts help beginners achieve reliable results. Digital kitchen scales provide even more accuracy, especially when working with ground egusi seeds.
Getting your egusi seeds ground just right separates amateur cooks from true professionals. The secret lies in achieving a texture that’s fine enough to create a smooth, creamy soup while retaining just enough coarseness to add body and character.
Start with completely dry, raw egusi seeds – never use pre-ground seeds that have been sitting around for weeks. Fresh grinding makes a world of difference in flavor and aroma. If you’re using a traditional grinding stone, work in small batches and apply steady, circular motions. The goal is a powder that feels silky between your fingers but still has tiny, barely visible granules.
For those using electric grinders, pulse rather than running continuously to prevent the natural oils from heating up and becoming bitter. Stop every 30 seconds to check your progress. You want the consistency of fine breadcrumbs, not flour. Too fine and your soup becomes gluey; too coarse and you’ll get a grainy, unpleasant texture.
Professional chefs often sift their ground egusi through a fine mesh to remove any stubborn chunks. Save these larger pieces for your next batch – waste nothing! The perfectly ground egusi should stick lightly to your palm when pressed but fall away easily when you shake your hand.
Smart meat and fish preparation sets the foundation for deeply flavored egusi soup. Start by cutting your meat into generous, bite-sized chunks – about 2 inches square. This size holds up beautifully during the long cooking process while absorbing all those rich flavors.
Season your meat at least 30 minutes before cooking, but preferably 2-4 hours ahead. Use a combination of salt, ground pepper, curry powder, thyme, and garlic powder. Massage these seasonings deep into the meat fibers – don’t just sprinkle them on top.
For fish, choose firm varieties like catfish, mackerel, or croaker that won’t fall apart during cooking. Clean thoroughly and make shallow diagonal cuts along the sides. These cuts help seasonings penetrate and prevent the skin from curling during cooking. Pat completely dry with paper towels before seasoning – excess moisture prevents proper browning and dilutes your soup.
Stock fish and dried fish need special attention. Soak stock fish in warm water for 45 minutes, then remove bones carefully. Break into manageable pieces. Dried fish should be briefly rinsed and cleaned of any debris, then broken into chunks. Don’t oversoak dried fish – you want it to retain its distinctive smoky flavor and firm texture.
Professional vegetable prep transforms good egusi soup into exceptional egusi soup. Each vegetable requires its own technique to maximize flavor, texture, and nutritional value.
Spinach needs thorough but gentle cleaning. Fill a large bowl with cold water and swish the leaves vigorously to remove sand and dirt. Change the water two or three times until it runs completely clear. Remove thick stems and tear leaves into bite-sized pieces rather than cutting – this prevents bruising and maintains better texture.
Bitter leaf requires more intensive preparation. Wash multiple times in salted water, squeezing and massaging the leaves to reduce bitterness. Rinse in fresh water after each salt water wash. Properly prepared bitter leaf should taste pleasantly bitter, not overwhelmingly so.
Pumpkin leaves (ugu) should be separated from tough stems and chopped into ribbons. Stack several leaves, roll them tightly, and slice across the roll to create thin strips. This technique ensures even cooking and beautiful presentation.
Onions deserve special attention since they form the flavor base. Dice them uniformly – about 1/4 inch pieces work perfectly. Uniform sizing ensures even caramelization when you’re building your soup base. Save the onion ends and outer layers for your stock pot – professional kitchens waste nothing.
Store all prepped vegetables in separate containers in the refrigerator if not using immediately. Cover with damp paper towels to maintain freshness and prevent wilting.
Start by heating your palm oil in a heavy-bottomed pot over medium heat. The key here is patience – rushing this step will ruin everything that follows. You want the oil to reach the right temperature without burning, which typically takes 3-4 minutes. Watch for the oil to shimmer slightly and become more fluid.
Once heated, add your chopped onions and let them sizzle for about 2 minutes. The onions should become translucent but not brown. This creates the aromatic foundation that makes restaurant-quality egusi so irresistible. Add your minced garlic and ginger, stirring continuously for another 30 seconds until fragrant.
Next, incorporate your blended tomato mixture. This is where many home cooks go wrong – they dump everything in at once. Instead, add the tomatoes gradually while stirring. The mixture should bubble vigorously, which means the oil temperature is perfect. Cook this base for 8-10 minutes, stirring occasionally, until the raw tomato taste disappears and the oil begins to separate slightly on the surface.
Your ground melon seeds need the right texture to create that signature thick, rich consistency egusi is famous for. The paste should be smooth but not completely liquid – think of it as having the texture of thick peanut butter mixed with a little water.
Before adding the egusi paste to your palm oil base, mix it with a small amount of warm stock or water. This prevents lumping and ensures even distribution. Add the paste gradually, one spoonful at a time, while stirring vigorously. Each addition should blend seamlessly into the oil base before adding the next.
The mixture will thicken almost immediately. If it becomes too thick, add small amounts of stock. If it’s too thin, cook it uncovered for a few extra minutes to reduce the liquid. You’re aiming for a consistency that coats the back of a spoon but still flows when stirred.
Protein timing separates amateur cooks from professionals. Different proteins require different cooking times, and adding them in the wrong order results in tough meat and overcooked fish.
Start with the toughest proteins first. If using beef or goat meat, add these to your egusi base and let them simmer for 15-20 minutes. The meat should be fork-tender before moving to the next step. Stock fish and dried fish come next – they need about 10 minutes to rehydrate and infuse their smoky flavors into the soup.
Fresh fish and seafood go in last, needing only 5-7 minutes of gentle simmering. Overcooking these delicate proteins makes them rubbery and unappetizing. Chicken falls somewhere in the middle, requiring about 12-15 minutes depending on the cut size.
Vegetables should maintain their color, texture, and nutritional value while absorbing the soup’s rich flavors. The secret lies in understanding which vegetables need longer cooking times and which should be added at the very end.
Bitter leaf and waterleaf are traditional choices that can handle longer cooking. Add these hearty greens about 10 minutes before your soup is finished. They’ll wilt down significantly, so don’t worry if the pot looks overpacked initially.
Spinach, pumpkin leaves, and other delicate greens need only 2-3 minutes of cooking time. Add them when you’re almost ready to serve, just long enough for them to wilt and turn bright green. Frozen spinach releases more water, so account for this by reducing your stock slightly.
Seasoning egusi is an art that develops over time. Start with your stock cubes or powder, but remember that these contain salt, so taste before adding more. Traditional seasonings include ground crayfish, locust beans (iru), and scotch bonnet peppers.
Crayfish adds that distinctive umami depth that makes egusi so addictive. Grind it fresh if possible, or toast store-bought ground crayfish in a dry pan for 30 seconds to awaken its flavors. Add this about 5 minutes before your soup is ready.
Pepper levels should build gradually. Start with less than you think you need – you can always add more, but you can’t take it away. Scotch bonnet peppers provide both heat and flavor, while dried red peppers add color and a different type of warmth. Taste frequently during the last 10 minutes of cooking, adjusting salt, pepper, and other seasonings as needed.
Nobody wants to bite into egusi soup and encounter lumps of ground seeds floating around like tiny pebbles. This texture nightmare happens when the egusi isn’t properly incorporated into the liquid base. The key fix is patience and technique.
If you’re already staring at a lumpy disaster, don’t panic. Remove the soup from heat immediately and use an immersion blender to smooth things out. Blend in short bursts to avoid over-processing the vegetables. No immersion blender? Transfer small portions to a regular blender, but let the soup cool slightly first to avoid dangerous splattering.
Prevention beats correction every time. Always mix your ground egusi with a small amount of stock or water to create a smooth paste before adding it to the pot. Think of it like making a roux – you want that silky consistency from the start. Whisk vigorously as you add the egusi mixture to the simmering broth, and keep stirring for the first few minutes to prevent clumping.
Some cooks swear by sieving their ground egusi before use to catch any stubborn chunks. While this extra step might seem tedious, it guarantees that smooth, restaurant-quality texture that makes all the difference.
Salt mishaps can turn your carefully crafted egusi into an inedible mess, but both problems have reliable solutions.
For oversalted soup, your best friend is dilution. Add more unsalted stock or water gradually, tasting as you go. Raw potatoes work like magic – drop in a few peeled chunks and let them simmer for 15-20 minutes. They’ll absorb excess salt naturally. Remove them before serving, or mash them into the soup for extra body.
Dairy products can also neutralize salt. A splash of unsweetened coconut milk or regular milk will mellow harsh saltiness while adding richness. Tomato paste or fresh tomatoes work similarly, bringing acidity that balances the salt.
Underseasoned soup needs a more strategic approach than just dumping in more salt. Layer your seasonings – add salt first, then taste. Follow with your bouillon cubes or powder, then individual spices. Remember that salt enhances other flavors, so adding it first makes everything else pop.
Don’t forget about acid and heat. A squeeze of lemon juice or a pinch of cayenne can wake up flat flavors instantly. Fresh herbs like scent leaf or bitter leaf added at the end provide aromatic complexity that makes the whole dish sing.
The smell of burnt egusi is unmistakable and heartbreaking, but don’t dump everything just yet. Quick action can save your soup from the trash bin.
First, stop cooking immediately and don’t stir. Stirring mixes the burnt bits throughout the entire pot. Carefully transfer the unburnt portion to a clean pot, leaving the scorched layer behind. Taste the rescued soup – if there’s only a hint of smokiness, you might actually like it. Many people enjoy that subtle charred flavor.
If the burnt taste is too strong, counteract it with sweetness. A small amount of sugar, honey, or even grated carrots can neutralize bitter flavors. Tomato paste works wonders too, adding both sweetness and acidity. Start with small amounts and build up slowly.
For severely bitter egusi, coffee grounds might sound crazy but actually work. Add a tablespoon of fresh coffee grounds in a cheesecloth bag, simmer for 10 minutes, then remove. The coffee absorbs bitter compounds without adding coffee flavor.
Prevention starts with proper heat management. Cook egusi on medium-low heat and stir regularly, especially when adding the ground seeds. Use a heavy-bottomed pot that distributes heat evenly, and never leave it unattended during the initial browning phase. Watch for color changes in your palm oil – if it starts turning black instead of golden, your heat is too high.
Serving and Storage Secrets from Expert Cooks
Traditional Nigerian accompaniments transform egusi soup from a simple dish into a complete, satisfying meal. Pounded yam stands as the most popular choice, offering a smooth, starchy base that perfectly complements the soup’s rich texture. The neutral flavor allows the complex spices and vegetables in your egusi to shine through.
Fufu made from cassava, plantain, or yam provides another excellent option. Its slightly tangy flavor adds depth to each bite. Eba (garri) offers a more budget-friendly alternative that’s equally delicious and authentic.
For those seeking variety, rice works beautifully – both white and jollof rice pair wonderfully with egusi. Boiled plantains add natural sweetness that balances the soup’s savory elements.
Professional chefs often serve egusi with multiple accompaniments, allowing diners to mix textures and flavors. Create small portions of 2-3 different sides rather than large amounts of one. This approach mimics upscale Nigerian restaurants and gives everyone options.
Protein pairings deserve special attention. While your egusi likely contains meat or fish, additional grilled chicken, beef suya, or fried fish on the side elevates the meal significantly. Fresh pepper sauce (ata din din) served separately lets guests adjust heat levels to their preference.
Egusi soup’s complex ingredients require careful storage to prevent spoilage and maintain optimal flavor. Cool completely before refrigeration – hot soup creates condensation that promotes bacterial growth and affects texture.
Refrigerator storage keeps egusi fresh for 3-4 days maximum. Use airtight glass containers rather than plastic, which can absorb oils and odors. Divide large batches into meal-sized portions to avoid repeatedly reheating the entire pot.
|
Storage Method |
Duration |
Best Containers |
Key Tips |
|
Refrigerator |
3-4 days |
Glass containers |
Cool completely first |
|
Freezer |
2-3 months |
Freezer bags/containers |
Remove excess air |
|
Room temp |
2 hours max |
Not recommended |
Bacteria multiply rapidly |
Freezing egusi extends storage to 2-3 months. Portion into freezer-safe containers, leaving 1-inch headspace for expansion. Label with dates and contents. Remove as much air as possible to prevent freezer burn.
The oil layer that forms on top acts as natural preservation. Don’t remove it during storage – this protective barrier keeps the soup fresh longer. Only skim excess oil when reheating if desired.
Vegetables like spinach and bitter leaf continue breaking down during storage. Slightly undercook these greens if you plan to store the soup, as they’ll finish cooking during reheating.
Stovetop reheating produces the best results for egusi soup. Use medium-low heat and stir frequently to prevent sticking and ensure even warming. Add small amounts of warm water or stock if the soup has thickened too much during storage.
Never use high heat when reheating – this breaks down the delicate ground melon seeds and can make proteins tough. The gentle warming process takes 8-10 minutes but preserves the soup’s original texture and flavor profile.
Microwave reheating works for single portions but requires careful attention. Use 50% power and heat in 1-minute intervals, stirring between each session. Cover the container with a microwave-safe lid or vented plastic wrap to retain moisture.
Frozen egusi needs special handling. Thaw overnight in the refrigerator before reheating. Never attempt to reheat directly from frozen, as this creates uneven temperatures and compromises food safety.
Texture restoration often requires adjustment after storage. The soup naturally thickens as oils solidify and ingredients settle. Gradually add warm broth, palm nut cream, or plain water while stirring until you achieve the desired consistency.
Taste and adjust seasonings after reheating. Storage can dull flavors, so a pinch of salt, fresh pepper, or bouillon cube often brings the soup back to life. Fresh herbs like scent leaves added during the final minutes of reheating brighten the entire dish.
Professional tip: Reserve some fresh vegetables when initially cooking if you plan to store the soup. Add these during reheating for improved texture and vibrant color.
Making restaurant-quality egusi soup at home isn’t as complicated as it might seem. With the right ingredients, proper preparation, and attention to timing, you can create a rich, flavorful soup that rivals what you’d get at your favorite Nigerian restaurant. Remember to grind your egusi seeds fresh when possible, take your time with the palm oil base, and don’t rush the cooking process – good egusi needs patience to develop those deep, complex flavors.
The difference between amateur and professional results often comes down to the small details: properly seasoning your meat, getting the consistency just right, and knowing when to add each ingredient. Start practicing these techniques today, and don’t be discouraged if your first attempt isn’t perfect. Even experienced cooks sometimes need a few tries to get their egusi exactly how they like it. Your family and friends will definitely notice the upgrade in your cooking game.
From Farm to Table: Supporting Local Manitoba Producers Manitoba’s local food movement connects conscious consumers with fresh, high-quality products straight

Top Cleaning and Household Essentials Every Home Needs Keeping your home clean doesn’t have to be overwhelming or expensive when